Making Buttons for Your Favorite Fandom
 5 Tips For Great Campaign Buttons
 How to make campaign buttons:10 Essentials for 2024
 How Colors Can Change the Mood of Your Custom Buttons

Buttons are a rare and underutilized resource for attracting attention, just like tossing a rock at your best friends window. The best part is, they come without the added danger of broken glass! Seriously though, buttons are an awesome way to get your name out there, or just to spice up your personal effects. If a pin can go through it, it can hold a button.
Alright, you want to order some buttons to promote your campaign, or your business, or even your web comic, but where to begin? Well, the artwork, duh.
1) Start with your Artwork
So if you want a nice looking button, you need nice looking artwork, right? Don't expect a fuzzy picture you saved off Google to come out looking sharp and clear unless you want a designer to redo it for you. A picture that you save off the internet is not the same as a picture made in Illustrator or Photoshop.
If you want the technical terms, try to keep your artwork at 300 dpi (dots per inch) or more. 300 dpi is the minimum for the best and sharpest looking buttons.
2) Next, Pick the Right Template
If you don't know what a template it, you should probably look it up, because not knowing will make this step especially confusing. The short of it is this: a template is a guideline which shows you where to place your button art.
Button makers will almost always have templates for you to use made specifically for their products. So all you need to do is decide what size and shape you want, download the correct template, and have at it. You can download Custom Button COmpanies templates by following this link. Get Custom Button Co Design Templates
3) Understanding That Template Lingo
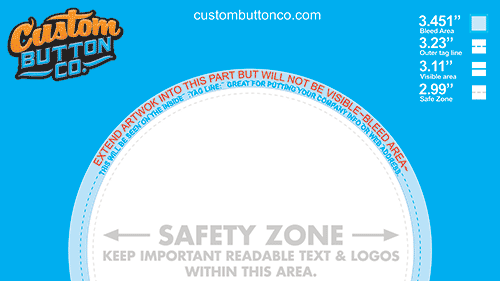
Understanding a template is not impossible if you don't know what a bleed is or what all those little dotted lines mean. So here's a little list of definitions to help you figure it out.
Bleed - When printed images 'bleed' off the page, it means that the picture extends all the way to the edges with no white space. Basically, anything important you want on your button should not extend passed the bleed line. You wouldn't want the head of your warrior princess artwork to be chopped off, would you? Keep her head in the lines!
CMYK - Yeah, it looks like code, but it's short for the printing color system that most printers use. This is Cyan Magenta Yellow and blacK. And yes, those are the only colors your printer uses too. The colors you see on your computer screen will not look the same printed out, because some colors on your screen don't actually exist in real life. So, when you're in Photoshop or Illustrator, make sure the color mode is changed to CMYK, or else you might not be happy when your neon greens and blues turn out dull and boring.
Lines - Pay attention to the lines!!!1!11one The lines on a template are usually clearly marked out and labeled. If the line is dotted, then there's a good chance that it's a bleed line or a fold line, and whatever extends beyond that line will not be visible. Make sure you read any text put on a template thoroughly. Most of the information you need will be written there for you, so just follow the guidelines to the T, and there should be no problem.
4) When do you Need a Designer?
Usually when you need to have something professional and you have absolutely no idea how to use Photoshop. If using Photoshop or Illustrator frustrates you to foaming at the mouth, then you should probably have a designer take over to save you the stress. A button isn't worth a heart attack!
5) Uploading!
This is the best part of the whole process, because it means you're done! Seriously, all you need to do once you have your work on a template is to stick it on the website, choose how many pieces you want, pay for your order, approve the proof (if you ordered one) and you're done. That's it. Sit back and bask in that afterglow.
Five steps and you should have your button order done and finished. Well don't just sit there reading this, you've got all the info you need now. Go forth!